
Have you ever wondered if timber windows can stand the test of time in Australia’s challenging climate? Are you curious about how proper installation might help your windows thrive for years to come? If so, you’re in the right place. In this blog post, we’ll explore everything you need to know about choosing, installing, and maintaining timber windows for maximum durability.
We’ll talk about the best types of wood, the step-by-step installation process, and the protective measures that keep your windows in prime condition. Plus, we’ll look into local building regulations in Australia and discuss maintenance tricks for humidity, heat, and coastal conditions. By the end of this guide, you’ll feel confident in tackling a timber window installation project—whether you’re a DIY enthusiast or prefer to call in a professional.
Throughout, we’ll keep things friendly, straightforward, and easy to follow. We’ll address common questions, including how to prevent rotting and warping, and how often timber windows should be repainted or retreated. From choosing the right species of wood to dealing with potential termite problems, you’ll have a clear roadmap for success. So let’s jump in and discover how to install timber windows for maximum longevity.
Choosing the Right Timber
Selecting the ideal timber for your windows isn’t just about looks. It’s also about quality, sustainability, and resistance to the elements. In Australia, you’ll find both hardwood and softwood options, each offering a unique combination of durability, cost-effectiveness, and easy installation.
Most Popular Hardwood and Softwood Options
Hardwood species, such as Merbau and Blackbutt, are known for their strength and resilience. They can handle harsh coastal conditions and high humidity. If you’re seeking an approachable price point, consider popular softwoods like Cedar or Pine. Softwoods are easier to work with, and they respond well to stains and treatments, making them a top choice for those looking for quick wins. Keep in mind that hardwoods may last longer overall, so weigh up factors like long-term maintenance versus initial expense before deciding.
Eco-Friendly and Sustainable Sources
For anyone aiming to reduce their environmental footprint, eco-friendly timber sources play a big role. Look out for products certified by reputable organisations that confirm sustainable harvesting practices. If you choose ethically sourced hardwood or softwood, you’ll not only support Australia’s forests but also enjoy a high-quality product that tends to be more robust. Plus, using renewable timber species can often mean lower overall costs in the future, given their natural durability.
What Are the Best Timber Species in Australia for Windows?
Whether you’re planning a new build or replacing existing windows, you might ask: “What are the best timber species in Australia for windows?” In many regions, Spotted Gum, Jarrah, and Tasmanian Oak are considered premium in terms of strength, beauty, and resilience. They’re well-known for their ability to handle Australia’s varying temperatures and resist pests. Always check with local suppliers to find out which species suit your unique climate conditions.

Preparing for Installation
Proper preparation can make or break your timber window project. By planning carefully, you’ll reduce the chance of common pitfalls—like drafts or poor insulation—that might crop up down the line.
Essential Tools and Materials Checklist
Before launching into your window installation, it’s essential to have the right tools on hand. Items like a quality saw, level, measuring tape, and safety gear should top your checklist. You’ll also want nails or screws suited to timber frames, along with a durable sealant to keep out moisture. Remember, making sure you have robust tools upfront can save you time and frustration during the installation.
Measuring and Planning Your Window Space
Accurate measurements are absolutely key when it comes to timber window installations. Start by measuring the height and width of your window opening from multiple points. This helps you spot any irregularities in the frame. If you’re uncertain about your calculations, double-check with a friend or an industry expert, as a tiny miscalculation can lead to major headaches during installation. It’s also smart to plan extra space for insulation and sealing products, especially if you live in areas prone to extreme temperature swings.
How to Check Local Building Regulations in Australia
Wondering how to check local building regulations in Australia? First, get in touch with your local council or building authority. They can advise on specific requirements for structural integrity, fire safety, and insulation standards. Depending on your location and the scope of your renovation, you may need a permit or inspection at certain stages of the project. Verifying these rules early on can spare you major trouble later, ensuring that your new timber windows align with all official codes.
Common Mistakes to Avoid
Some of the biggest pitfalls with timber window installations are directly related to poor planning. People often forget to allow enough space for proper sealing, letting moisture seep in. Another common issue is skipping protective treatments, which can lead to rot or cracking. Lastly, rushing your measurements can result in ill-fitting windows and frequent repairs. With a little advanced preparation, you’ll be able to steer clear of these mistakes and enjoy top-notch results.
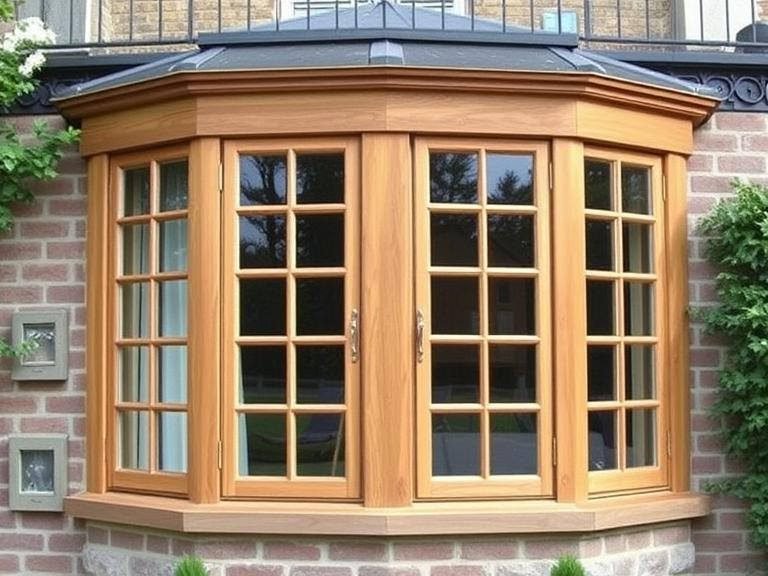
Step-by-Step Installation Guide
Now comes the exciting part: putting your carefully chosen timber windows in place. By following a clear, step-by-step approach, you’ll help guarantee that your windows stay secure and weatherproof for years to come.
Removing Old Windows and Frames
Before you start, make sure you’ve laid down drop sheets or protective coverings to avoid damage to your floors or walls. Begin by carefully prying off any trim or mouldings around the existing window. Then, unscrew or detach the old frame from the wall. Use a crowbar gently, so you don’t create big holes or splinters in the wall. If your old windows are particularly heavy, grab a mate to help with the lifting and handling.
Positioning and Securing the Timber Window
Next, it’s time to position your new frame within the opening. Check if it’s level using a spirit level or laser tool. Gaps should be even all around. Secure the frame with screws or nails suited to timber, making sure to drive them deep enough to hold the frame firmly without splitting the wood. If you’re working with a large window, fix the top corners first, then adjust the bottom and sides as needed. Confirm that your window operates smoothly before sealing everything in place.
Finishing Touches: Paints, Stains, and Treatment Options
With your window in place, you can pick a finish that suits your home’s style. Some homeowners opt for a transparent stain to showcase the natural wood grain, while others prefer a bold coat of paint. In humid or coastal regions, applying a protective treatment designed for moisture resistance is critical. Stains and sealing agents that repel UV rays also help preserve the timber’s colour, reducing the need for frequent touch-ups. Give the finish ample time to dry before installing any hardware or trim to avoid smudges or uneven coverage.
Ensuring Maximum Longevity
Timber windows can stand strong for decades if you treat them right. Simple measures like choosing the best protective coatings or checking for minor damage can hugely extend your windows’ lifespan.
Protective Coatings and Maintenance Routines
Don’t forget to reapply paint or protective stains every few years, especially if your windows receive a lot of direct sunlight. The scorching Aussie sun can fade finishes quickly, so keep an eye on the colour and sheen. If you notice the coating peeling, it’s time for a fresh layer. Regular cleaning with mild soapy water will also remove dirt and salt deposits, crucial if you’re near the coast. A little TLC goes a long way in keeping your timber windows looking sharp.
Dealing with Humidity, Heat, and Coastal Conditions
Australia’s humidity and heat can cause timber to expand and contract, leading to small gaps. Similarly, salt-laden coastal winds may speed up corrosion of metal parts, like hinges and handles. Use corrosion-resistant components whenever possible, especially if you’re installing windows in beachfront properties. You might also rotate your windows’ opening position from time to time, preventing one side of the frame from weathering more quickly than the other.
Troubleshooting and Common Issues
Even with the best preparation, occasional problems can arise. Thankfully, most can be sorted out with prompt action and a bit of know-how.
Identifying and Repairing Small Cracks or Damage
Timber inevitably expands and contracts, so tiny cracks aren’t uncommon. To fix them, fill with wood putty that matches your window’s colour, then sand smooth once dry. If the damage is more extensive, you might need to replace that section of timber. Make sure that the area is fully dry before adding wood putty or a new coat of paint for optimal adhesion.
Conclusion
Summing up, installing timber windows for maximum longevity is all about choosing the right species of wood, preparing meticulously, and following a careful, step-by-step installation process. By measuring accurately, using proper insulation and sealing methods, and applying finishes that shield your timber frames from Australia’s variable climate, you’ll set yourself up for long-lasting success. Plus, when you keep to a regular maintenance schedule—especially in coastal or high-heat areas—your windows will hold up for decades.